
Download Trial Now
(You can purchase a license within the app or email us for a free one if you'd rather wait. It's entirely up to you!)
For Mac OS X 10.7 and up including 10.9 Mavericks
Quick Instructions
We try to make PinPoint Pro as intuitive as possible, but is offers quite a few options. Here is where you will find information on all the nitty gritty details. You can also consult our FAQ and of course, please contact us if you need anything.
If PinPoint Pro offers too many options for your simple needs, perhaps you will find the regular version of PinPoint more appropriate. Eventually, we will move to a common core and integrate some of PinPoint's functionality into PinPoint Pro if there is enough interest.
We love beta testers, but we also need to support our families. If you think PinPoint Pro's objectives are useful, please do get your own license. If you would rather give a hand for free until the product is completely ready, send us a note and we'll send you a free license right away. It is all up to you!
To get your own license, simply use the built-in store in this version. It will help test this process as well.
Beta Testers: Currently known issues are being listed here

Interacting with PinPoint Pro
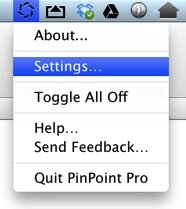
PinPoint Pro is controlled through a menu item you will find at the top of your screen, next to some of the other built-in items from Mac OS X. To call up its Settings Window or Quit PinPoint Pro, select the appropriate option from that menu.
Selecting Pointers
PinPoint Pro can display multiple effects at once. You select which effects are enabled by using the checkboxes next to each one.
Once selected, you can still toggle each one on or off by setting a Shortcut key or using the Action menu at the bottom of the list.
Important: Each effect takes up CPU power, so be aware that having tons of effects simultaneously will make things slower.
Keyboard Shortcuts
To set a shortcut for each pointer, click on the pointer in the list, then set its Keyboard Equivalent at the bottom right of the Settings window.
You can also set multiple pointers to use the same Shortcut by assigning a first one to a pointer, then, for subsequent ones, select the name of the other pointer from the list.
A shortcut can be set to Toggle a pointer when it is always visible, or simply turn it on until it disappears again automatically either because you moved it or after a delay.
Flipping pointers
When you tie two pointers to the same shortcut key, you can use the Action menu at the bottom of the list, to toggle one pointer separately. This allows you to toggle between two pointers using the same shortcut key.
Adding and removing pointers
PinPoint Pro comes with a list of preconfigured pointer effects, but you can also create your own. Do not worry about changing the parameters of existing pointers, they can all be added back in their original state by using the + sign at the bottom of the window. You will also discover additional pointer types in this list.
NOTE FOR BETA TESTERS: The list of original pointers is not yet defined. This will vary and change by the time we release.
Display options
You can set PinPoint Pro to display when you move the mouse only, or when it is idle and set delays before it appears or disappears.
General Settings
At the top of the settings window, you can select the Settings tab, which brings you to the settings which are not tied to any specific pointer. You will find quite a few useful options here.
Master Toggle
You can set a general toggle key which will toggle All pointer effects at once.
Launch at startup (not implemented yet in beta 1)
Hide Menu icon: Run PinPoint without the Menu icon at the top. Click the Dock icon or Double-click the App icon to display settings again.
Hide Dock icon: Disable the Dock icon completely, except when settings are optn.
Hide with System Pointer: Automatically hide PinPoint Pro when your Mac hides the system pointer, such as when a movie is playing or when you are typing.
Disable PinPoint during screenshots: Hides PinPoint when you try to take a screenshot. You can do this for regular effects, but also to hide Pointer effects which display Steps or Pressed keys.
Step Display Shortcuts
If you are using Step Display Pointer effects (see that section), then, you can change the keyboard shortcuts used to move from one step to another.
Layers
Each pointer effect can be composed of multiple layers. Each layer displays a graphical element and defines some settings. For example, the Crosshair pointer is actually composed of one vertical line and one horizontal line. You can define them separately.
There are many combinations possible, but some may yield strange behaviors, such as stretching alayer horizontally and have it rotate at the same time. So experiment, but beware.
Appearance (eye)
Change general aspect of your layer by setting its color, scaling, transparency, image, etc.
You can select your own graphic which can be either a PNG image or an SVG (SVG support is limited and can yield strange results).
It also offers a series of generic primitives to choose from.
If the shape is a vector shape, then you will have a few extra appearance options like Edge Blur, Stroke size and Shadow..
Behaviour (Ruler)
This is where you can set a few very specific parameters for your pointer.
Stretching
You can opt to have a layer stretch horizontally or vertically, or not be stretched at all. You will see an option for "Display Layer" which is used by the "Steps" and "Keyboard Visualizer" type layers only.
Inverted (Punch hole)
This is used to create a "Follow Spot" type effect, where your shape is used to punch a hole through a darker full-screen layer.
Important: animations get disabled when this is active.
Mouse tracking or Steps
You can opt to have this layer follow your mouse Horizontally, vertically or both (full tracking). For Horizontal or Vertical tracking, you indicate where the layer will be positioned on the screen (left, right, top or bottom).
Only when mouse clicked is how you have an effect appear only when the mouse button is down.
Using the Move to click position is a neat way to have a shape only move to where your mouse is clicked.
Hides when under pointer
This is useful for Step-type layers, so that if you are displaying some text on the screen, it will temporarily hide when you pass over it with the mouse and reappear once the mouse moves further.
Watch out, if you enable this with a layer which follows your mouse around, it will never appear.
Steps
For Step-type layers, this is where you manage the content of all your steps to be displayed. Steps are simply messages you wish to have displayed on screen when you press certain key combinations, to announce a section of your screencast or to underline something specific on screen.
Animations (Circular arrow)
Each layer can be independently animated. One layer can pulse while another can rotate. There are a variety of effects to choose from to achieve the required effect.
Base animation: This is the animation for this layer when no mouse button is pressed
Right/Left Click: The animation will become this one while the corresponding mouse button is pressed.
You can also opt to have an audible click sound be heard when you press and release each mouse button.